

Manicure and pedicure kit
etsy.com
etsy.com

Giorgio Armani volumizing mascara
$38 – selfridges.com
$38 – selfridges.com

Lengthening mascara
nastygal.com
nastygal.com

MAC Cosmetics lips makeup
bloomingdales.com
bloomingdales.com


Hey Guys! Am back with another DIY, since I have sooo many brushes and usually have them in different cases I had thought about make on big brushes holder and putting it on top of my vanity. I’ve seen a couple of videos already on how to do this DIY brush holder but I went a head and picked out a different size of container and color. So I went out and bought the stuff I needed at (Michael’s) of course. You can do this with any size or color you want its going to be the same steps. So if you guys want to know how to make this DIY brush holder then keep on reading down below!
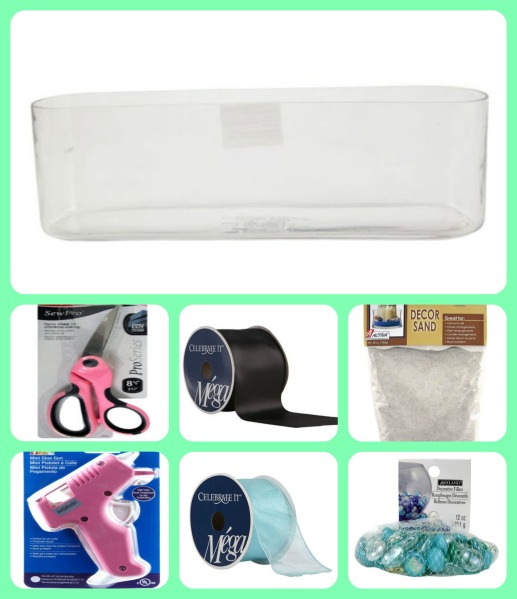
Materials
Glass Vase (I got Oval)
Ribbon you can mix & match
Sand or Glass Gems
Scissors
Hot Glue Gun
Flower or Bow
1.First i started with a clean vase.i got the oval shape one since i have alot of brushes. but you can pick and size or shape you like.

2.I took the Ribbon my fave color is Aqua/Turquoise color so that’s the color of ribbon i pick you can pick whatever color you prefer. So just take the Ribbon & Scissors and measured the ribbon around the vase cutting about an inch extra.


3.Then taking the pieces of ribbon you already cut and your glue gun. what i did i layered the ribbons so i glued down the darker color first then the second color on top of that. You want to glue the ribbon in small sections but be careful because it gets really hot. I glued down every 4inch just to make sure it was tight and secure. I let it for about an hour to make sure it was dried all the way.

4.Then when it was completely dry I took the decor sand and I poured it inside the vase. For the sand you can also do two colors as well but i liked the way it looks with just one color. Also instead of sand you can use gem or stone if you like but i notice that for brushes those actually ended up scratching my brush handles so i prefer the sand.


5.For the final step you can glue a bow or flower on the front and you are done!

~KNOC♥
